Overview
This is all based on this recipe -> https://community.rockrms.com/recipes/353/installing-a-custom-icon-font
Below are a couple of additional tips/how-tos.
Using Photoshop to prep the PNG file.
Assuming you have a B&W image you want to use as a custom ICON. Use Photoshop to prep the PNG as follows:
- Crop/Resize the image to fill a 256x256px canvas
- Remove everything except the black lines that will be the icon
- Save the image as a PNG with transparency
Using Illustrator to convert the PNG to an SVG
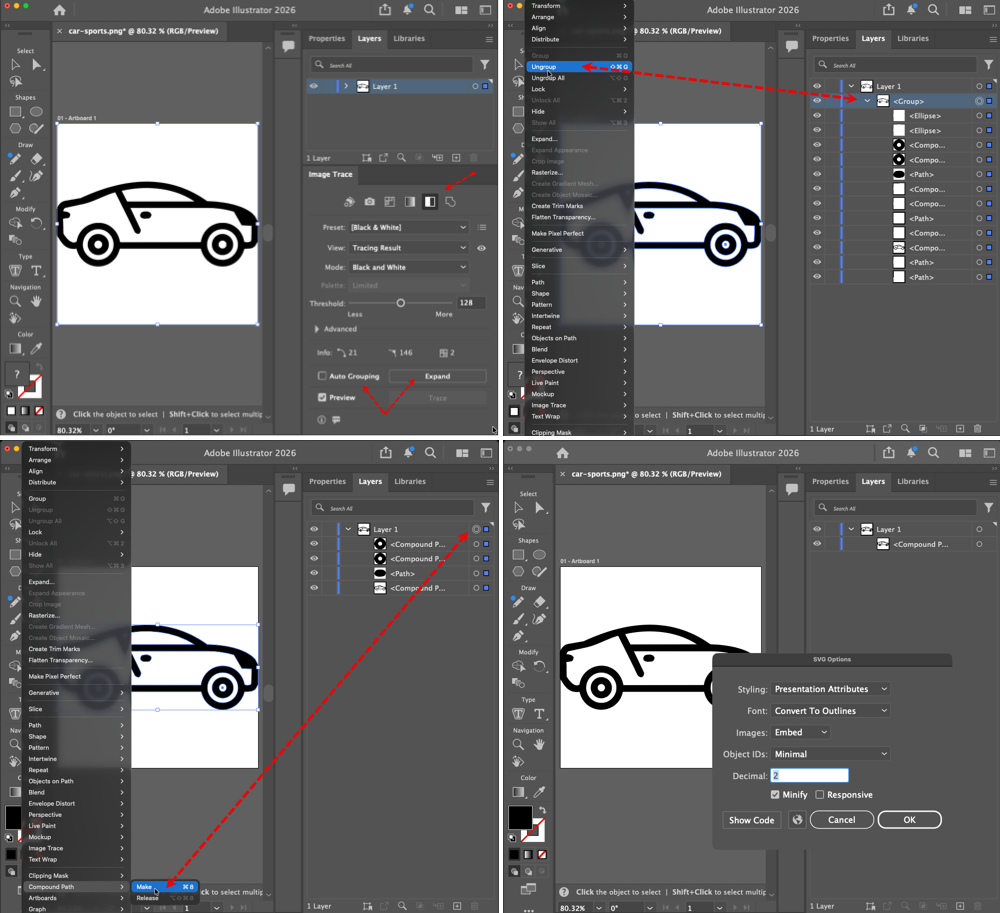
Open your prepped PNG file in Illustrator and complete the following steps
- Select the object
- Open the Image Trace Window and select the Black and White preset
- Confirm the traced image looks as desired
- Uncheck Auto Grouping and press the Expand button
- Open the layers for the image and select the Group and Ungroup it (>Object>Ungroup - Shift+Cmd+G).
- Delete all the layers that are just white (i.e. not part of the black lines)
- Select all the layers and Make Compound Path (>Object>Compound Path>Make - CMD+8)
- Export image as SVG with the following options
- Styling: Presentation Attributes
- Font: Convert to Outlines
- Images: Embed
- Object IDs: Minimal
- Decimal: 2
- Minify: checked
- Responsive: unchecked
Using Icomoon.io to build the custom icon library
Use the recipe above for complete steps - but here are some tips/adjustments. NOTE: These only work with their "old" app - not the "new" app.
- After you drag/upload your SVG files for the icons into the Project/Set - edit each one and do the following:
- Change the Names field to be the exact class you want to use (all lowercase - no spaces)
- Change the canvas to be Square and Center the image on the Canvas
- Rescale the image to fill the canvas
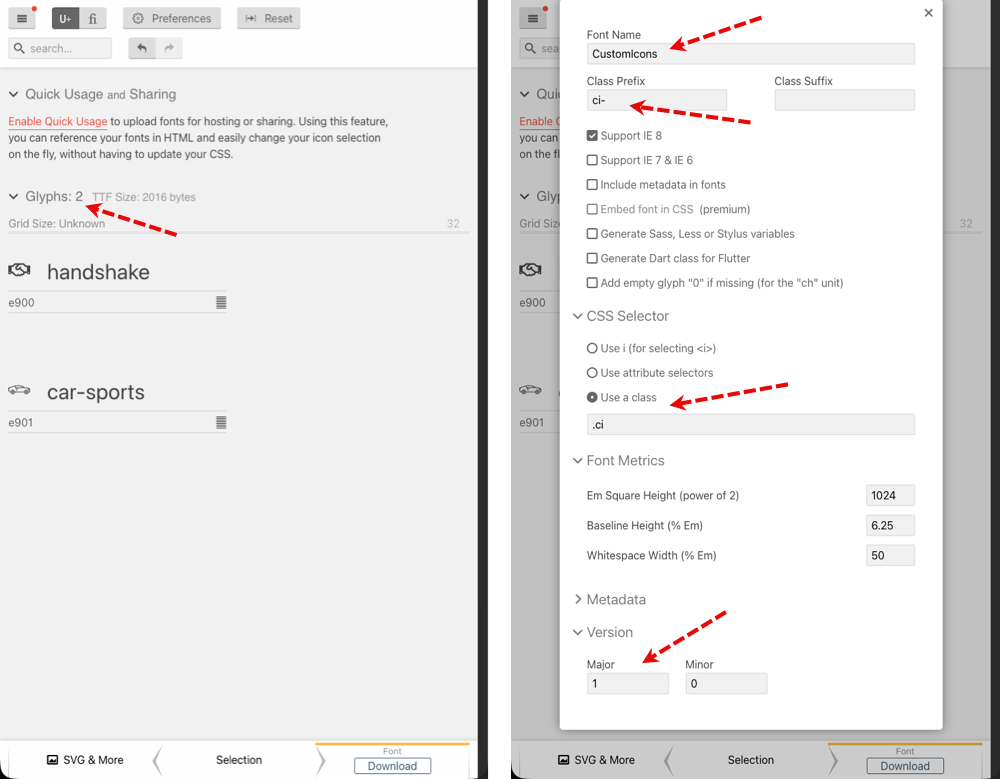
- When you go to Font Download tab - check the following:
- The number of Glyphs should be the exact same as the number of fonts in your set. If this number is higher - than 1 or more of your original SVG files needs to be fixed (see above)
- Adjust the Download Preferences as follows:
- Set the Font Name - this will be the name of the font files that will be saved the Rock file system
- Change Class Prefix to be "ci-"
- DO NOT check "Generate Sass, Less or Stylus variables" as the recipe says
- Change CSS Selector to "Use a class" and set it to ".ci"
- OPTIONAL: Set the Version number (useful for tracking when you have added/removed icons from your font library
Installing the Font
Warning
These steps differ from the recipe!
- Unzip the file downloaded from icomoon.io
- Copy the 4 files from the 'fonts' Folder to the Rock filesystem in the folder /Assets/Fonts/CustomIcons (or whatever you called the font).
- Duplicate the styles.css file and rename to CustomIcons.css
- Edit CustomIcons.css and adjust the path to the font files to be:
../../Assets/fonts/CustomIcons/filename - Put CustomIcons.css in the folder /Styles/CustomIcons on the Rock filesystem
- For each theme that will use these custom icons
- Edit the theme and add the following to the CSS Overrides:
@import "../../../Styles/CustomIcons/CustomIcons.css"; - NOTE: This ONLY works with Website Legacy themes - NOT Website NextGen themes
- For NextGen themes - copy the content of the CustomIcons.css file into the CSS Overrides - BUT be sure to change the path to the font files to be:
../../../Assets/fonts/CustomIcons/filename
- You may need to clear the Rock cache and your browser cache to see the changes and get the font files to load
Adding new Icons to Existing CustomIcons Font File
In the original downloaded zipfile there was a file called selection.json - you will need this file.
Go to icomoon.io and manage projects in the old app. Import the selection.json file. Add your new icons and follow everything else above - replacing files and settings.